As a former Senior Solution Engineer at Oracle Cloud, I am excited to share how you can deploy YugabyteDB, the modern distributed database, on Oracle Cloud Infrastructure (OCI).
YugabyteDB’s scalability and high availability make it the ideal solution for optimizing workloads in Oracle Cloud.
Our previous blog shared how to install YugabyteDB on Oracle Cloud OKE. Oracle Kubernetes Engine (OKE) is built on top of OCI and offers a complete stack of high-performance infrastructure designed for resource-intensive workloads. In this blog, we walk through the steps required to install YugabyteDB Anywhere on Oracle Kubernetes Engine (OKE).
Installing YugabyteDB Anywhere on Kubernetes
To install YugabyteDB Anywhere on Kubernetes you need to already have created a Kubernetes cluster on OKE. You can follow these guidelines to create a cluster in OKE.
Installing YugabyteDB Anywhere to a Kubernetes pod requires a service account with a role binding to an admin role for at least one namespace. This blog assumes you have these permissions. If you cannot allow the creation of this service account, you can disable the automatic creation and instead specify a pre-created service account. See our docs for more details.
Now, let’s install YugabyteDB Anywhere.
First, connect to Oracle Cloud shell and create a namespace for YugabyteDB Anywhere:
dev@cloudshell:~ (uk-london-1))$ kubectl create namespace yb-platform
namespace/yb-platform created
To install Yugabyte Anywhere, you will need a secret file that grants access to download Yugabyte Anywhere from the repository. You can obtain the secret file from Yugabyte Support and apply it to the namespace created for the Yugabyte Anywhere Installation:
dev@cloudshell:~ (uk-london-1)$ kubectl create -f emea-secret.yaml -n yb-platform
secret/yugabyte-k8s-emea created
Add the YugabyteDB Anywhere repository:
dev@cloudshell:~ (uk-london-1)$ helm repo add yugabytedb https://charts.yugabyte.com
"yugabytedb" has been added to your repositories
Check for the latest version of YugabyteDB Anywhere:
dev@cloudshell:~ (uk-london-1)$ helm search repo yugabytedb/yugaware
NAME CHART VERSION APP VERSION
yugabytedb/yugaware 2024.2.0 2024.2.0.0-b145
yugabytedb/yugaware-openshift 2024.2.0 2024.2.0.0-b145
Now, install this version into the namespace that you have created:
dev@cloudshell:~ (uk-london-1)$ helm install yba-oke yugabytedb/yugaware --version 2024.2 -n yb-platform --set image.pullSecret=yugabyte-k8s-emea --wait
NAME: yba-oke
LAST DEPLOYED: Thu Nov 21 14:38:07 2024
NAMESPACE: yb-platform
STATUS: deployed
REVISION: 1
You need to set image.pullSecret to match your license. Check the metadata name in your secret file for the correct value. You can adjust the Helm installation by customizing service accounts, TLS, nodeSelectors, and more. See our docs page for more information.
Next, check that the service and the pod for YugabyteDB Anywhere have been initialized and are running:
dev@cloudshell:~ (uk-london-1)$ kubectl get svc -n yb-platform
NAME TYPE CLUSTER-IP EXTERNAL-IP yba-oke-yugaware-ui LoadBalancer 10.96.136.176 143.47.242.131

dev@cloudshell:~ (uk-london-1)$ kubectl get pods -n yb-platform
NAME READY STATUS RESTARTS AGE
yba-oke-yugaware-0 3/3 Running 0 2m16s
Kubernetes Service Account For YugabyteDB Universe Nodes
YugabyteDB Anywhere requires a service account in the Kubernetes cluster and a corresponding kubeconfig file as a prerequisite for creating pods and deploying database clusters.
In this case, we will let YugabyteDB Anywhere auto-fill these values using the existing service account and the kubeconfig file used for your YugabyteDB Anywhere installation.
If you prefer, you can create a service account with specific roles and global or namespace permissions. See our docs for more information.
Create an OKE Provider in YugabyteDB Anywhere
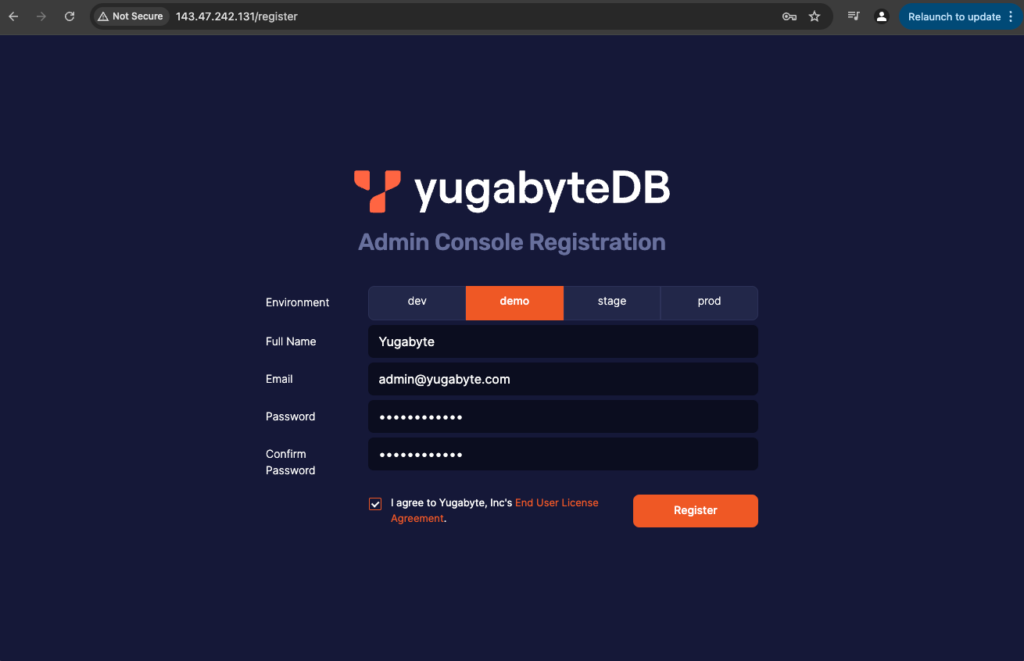
Go to https://<EXTERNAL-IP>/register and complete your login details:

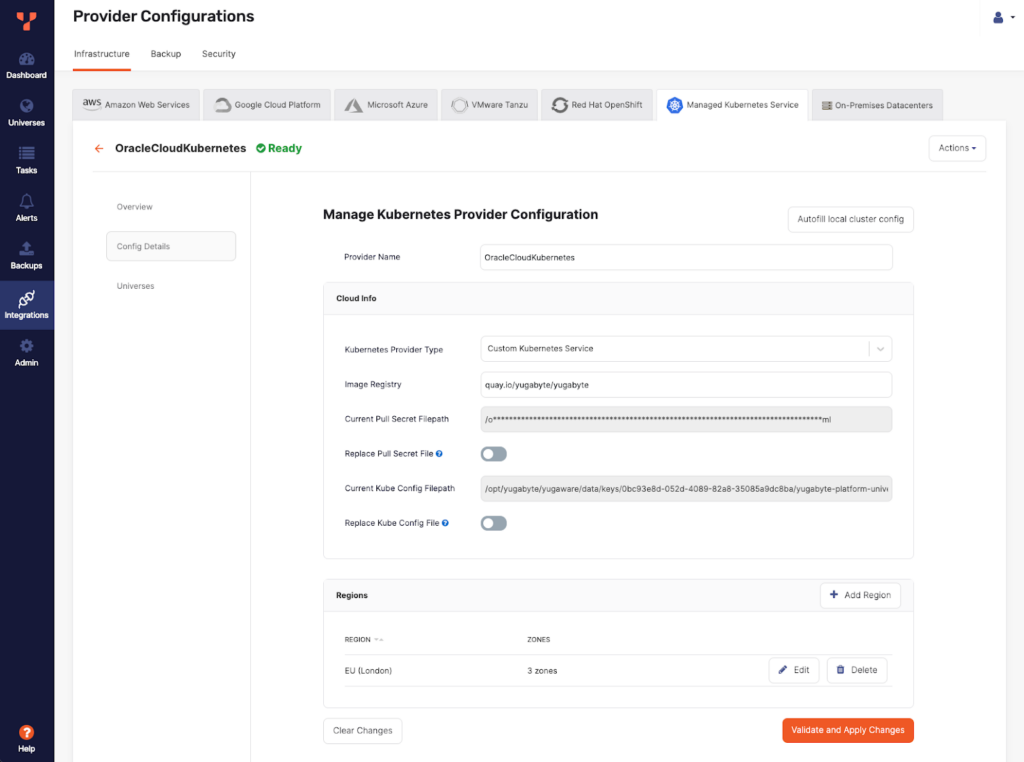
After logging in, click Configure a Provider. This will take you to Integrations. Select Managed Kubernetes Service and press the ‘Autofill local cluster config’ button. The provider details will be pre-populated based on the OKE cluster.
Next, update the provider details
- Update and set your preferred provider name
- Kubernetes Providers Type – prefilled as Custom Kubernetes Service – skip this
- Image Registry – prefilled as quay.io/yugabyte/yugabyte – skip this
- Pull Secret – prefilled matching your license – skip this
- Kube Config – skip this
- Regions – prefilled based on your OKE cluster
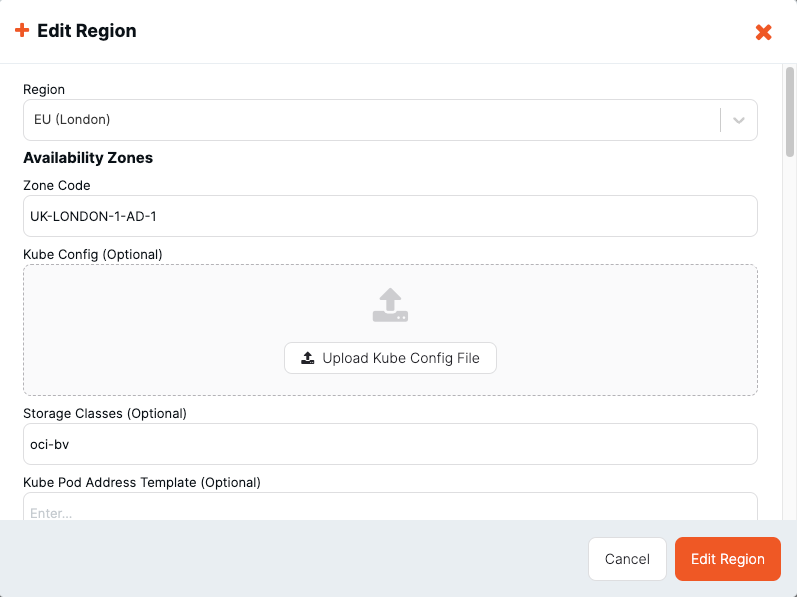
- Edit and validate that the region and zones are as expected. As the OCI region names are not currently listed in the drop-down, select the region closest to your config in the drop-down.
- For Oracle Cloud Region Identifier, please refer to ‘Regions and Availability Domains.’
- Update the storage class for each region to set the desired storage class (which is oci-bv by default in Oracle Cloud). Remember that volume size impacts the IOPS and throughput when using the default balanced performance block volumes. See ‘Balanced Performance’ for more details.

- Validate and Save Configuration

Create Your YugabyteDB Universe
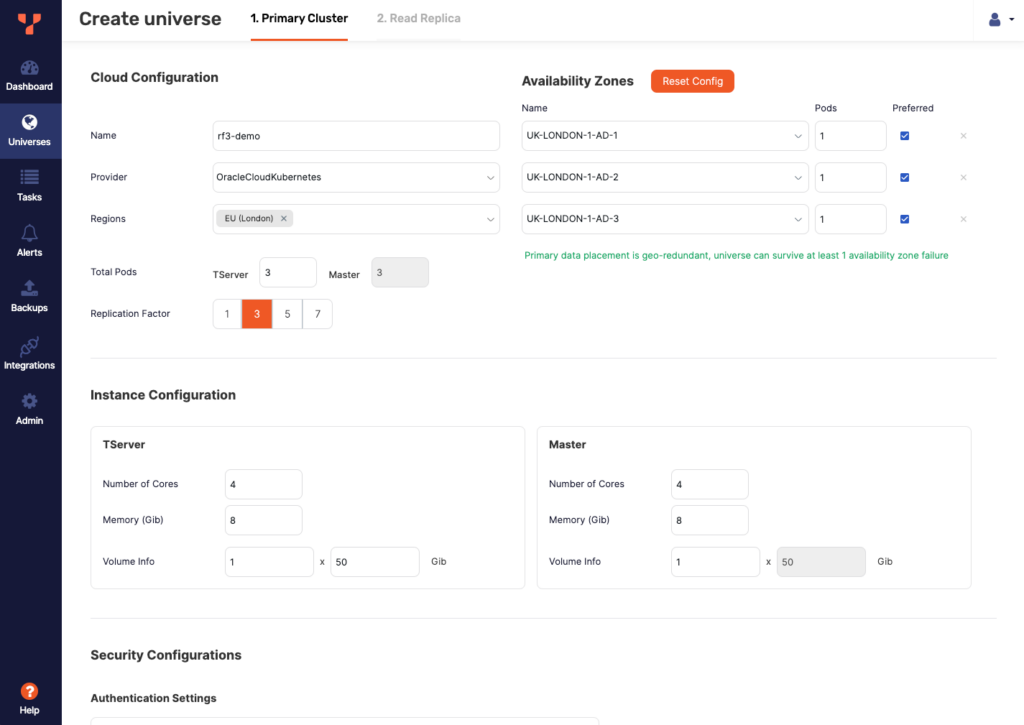
Go to Universes > Create universe and enter the required details. Click Create to complete.

As per other cloud provider deployments, ensure all required network ports are allowed.
Conclusion
YugabyteDB Anywhere is a great option on Oracle Cloud, which allows you to simplify database monitoring and management. By following the instructions above, you can easily configure highly scalable YugabyteDB Anywhere on Oracle Cloud and take advantage of this popular deployment option.
Contact us directly if you’d like to learn more about the benefits of deploying YugabyteDB Anywhere in your OCI environment.
As a former Senior Solution Engineer at Oracle Cloud, I am excited to share how you can deploy YugabyteDB, the modern distributed database, on Oracle Cloud Infrastructure (OCI).
YugabyteDB’s scalability and high availability make it the ideal solution for optimizing workloads in Oracle Cloud.
Our previous blog shared how to install YugabyteDB on Oracle Cloud OKE. Oracle Kubernetes Engine (OKE) is built on top of OCI and offers a complete stack of high-performance infrastructure designed for resource-intensive workloads. In this blog, we walk through the steps required to install YugabyteDB Anywhere on Oracle Kubernetes Engine (OKE).
Installing YugabyteDB Anywhere on Kubernetes
To install YugabyteDB Anywhere on Kubernetes you need to already have created a Kubernetes cluster on OKE. You can follow these guidelines to create a cluster in OKE.
Installing YugabyteDB Anywhere to a Kubernetes pod requires a service account with a role binding to an admin role for at least one namespace. This blog assumes you have these permissions. If you cannot allow the creation of this service account, you can disable the automatic creation and instead specify a pre-created service account. See our docs for more details.
Now, let’s install YugabyteDB Anywhere.
First, connect to Oracle Cloud shell and create a namespace for YugabyteDB Anywhere:
dev@cloudshell:~ (uk-london-1))$ kubectl create namespace yb-platform namespace/yb-platform created
To install Yugabyte Anywhere, you will need a secret file that grants access to download Yugabyte Anywhere from the repository. You can obtain the secret file from Yugabyte Support and apply it to the namespace created for the Yugabyte Anywhere Installation:
dev@cloudshell:~ (uk-london-1)$ kubectl create -f emea-secret.yaml -n yb-platform secret/yugabyte-k8s-emea created
Add the YugabyteDB Anywhere repository:
dev@cloudshell:~ (uk-london-1)$ helm repo add yugabytedb https://charts.yugabyte.com "yugabytedb" has been added to your repositories
Check for the latest version of YugabyteDB Anywhere:
dev@cloudshell:~ (uk-london-1)$ helm search repo yugabytedb/yugaware NAME CHART VERSION APP VERSION yugabytedb/yugaware 2024.2.0 2024.2.0.0-b145 yugabytedb/yugaware-openshift 2024.2.0 2024.2.0.0-b145
Now, install this version into the namespace that you have created:
dev@cloudshell:~ (uk-london-1)$ helm install yba-oke yugabytedb/yugaware --version 2024.2 -n yb-platform --set image.pullSecret=yugabyte-k8s-emea --wait NAME: yba-oke LAST DEPLOYED: Thu Nov 21 14:38:07 2024 NAMESPACE: yb-platform STATUS: deployed REVISION: 1
You need to set image.pullSecret to match your license. Check the metadata name in your secret file for the correct value. You can adjust the Helm installation by customizing service accounts, TLS, nodeSelectors, and more. See our docs page for more information.
Next, check that the service and the pod for YugabyteDB Anywhere have been initialized and are running:
dev@cloudshell:~ (uk-london-1)$ kubectl get svc -n yb-platform NAME TYPE CLUSTER-IP EXTERNAL-IP yba-oke-yugaware-ui LoadBalancer 10.96.136.176 143.47.242.131 dev@cloudshell:~ (uk-london-1)$ kubectl get pods -n yb-platform NAME READY STATUS RESTARTS AGE yba-oke-yugaware-0 3/3 Running 0 2m16s
Kubernetes Service Account For YugabyteDB Universe Nodes
YugabyteDB Anywhere requires a service account in the Kubernetes cluster and a corresponding kubeconfig file as a prerequisite for creating pods and deploying database clusters.
In this case, we will let YugabyteDB Anywhere auto-fill these values using the existing service account and the kubeconfig file used for your YugabyteDB Anywhere installation.
If you prefer, you can create a service account with specific roles and global or namespace permissions. See our docs for more information.
Create an OKE Provider in YugabyteDB Anywhere
Go to https://<EXTERNAL-IP>/register and complete your login details:

After logging in, click Configure a Provider. This will take you to Integrations. Select Managed Kubernetes Service and press the ‘Autofill local cluster config’ button. The provider details will be pre-populated based on the OKE cluster.
Next, update the provider details
- Update and set your preferred provider name
- Kubernetes Providers Type – prefilled as Custom Kubernetes Service – skip this
- Image Registry – prefilled as quay.io/yugabyte/yugabyte – skip this
- Pull Secret – prefilled matching your license – skip this
- Kube Config – skip this
- Regions – prefilled based on your OKE cluster
- Edit and validate that the region and zones are as expected. As the OCI region names are not currently listed in the drop-down, select the region closest to your config in the drop-down.
- For Oracle Cloud Region Identifier, please refer to ‘Regions and Availability Domains.’
- Update the storage class for each region to set the desired storage class (which is oci-bv by default in Oracle Cloud). Remember that volume size impacts the IOPS and throughput when using the default balanced performance block volumes. See ‘Balanced Performance’ for more details.

- Validate and Save Configuration

Create Your YugabyteDB Universe
Go to Universes > Create universe and enter the required details. Click Create to complete.

As per other cloud provider deployments, ensure all required network ports are allowed.
Conclusion
YugabyteDB Anywhere is a great option on Oracle Cloud, which allows you to simplify database monitoring and management. By following the instructions above, you can easily configure highly scalable YugabyteDB Anywhere on Oracle Cloud and take advantage of this popular deployment option.
Contact us directly if you’d like to learn more about the benefits of deploying YugabyteDB Anywhere in your OCI environment.


